DIY E-Bikes, Demystified: A Beginner’s Guide
Lynxcle-Tommy
Summary: This is a controller-first, high-signal guide to building a reliable DIY eBike with electric bicycle conversion kits. We start with the “brain” (your controller), show a compact wiring diagram, then move in one straight line: signals (PAS/torque, brake cut-offs, lights), legal frames (EU EPAC via EN 15194; UK road rules via EAPC and product compliance via UKCA with BS EN 15194 as a designated standard), battery/charger discipline, braking and hardware that keep you in control, and a 10-step plan. Red links are official or technical sources.
🧭 Quick navigator — jump where you need:
- Story: when the “brain” changes the bike
- Controller-first architecture (with wiring diagram)
- Compliance in plain words (EU EPAC, UK EAPC & UKCA)
- Power & Range Mini-Calculator
- Choosing electric bicycle conversion kits (hub vs mid-drive)
- Battery & charger discipline (standards, connectors)
- Braking & mechanics: keep control
- A 10-step conversion plan
- FAQ (click to expand)
- Sources (short, high-quality list)
Story: when the “brain” changes the bike
You open a plain box labeled “FOC controller.” It doesn’t look like much—just a slab of aluminum with a bundle of connectors—but this little box decides how the whole machine feels: how fast current ramps, how smoothly torque blends with your pedaling, whether the system protects itself on long climbs, and if the lights and cut-offs behave like a well-trained orchestra. When you start from the controller, everything else—battery, motor, sensors, brakes—falls into a clear architecture instead of a cable salad.
Mindset: Define signals and limits first; select hardware second. The controller is your constraints made silicon.
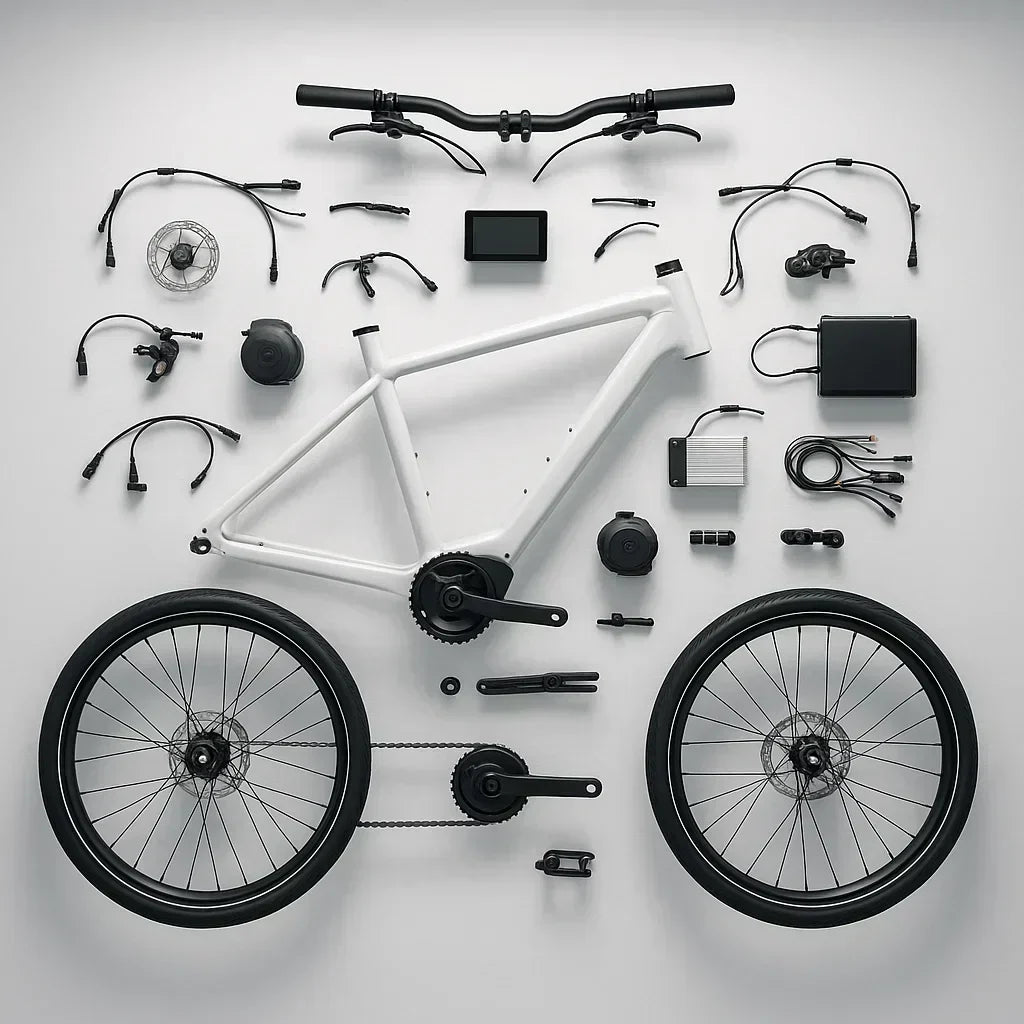
Controller-first architecture (with wiring diagram)
The controller reads your inputs (PAS or torque sensor, throttle, brake cut-offs), enforces limits (current, temperature, speed), and drives the motor phases. Your job is to give it clean inputs and sane power paths: short runs for high current, proper strain relief, and waterproof connectors with good retention. Keep the logic simple and the electrons happy.
Simplified wiring: battery → lock (optional) → controller → motor; controller also talks to display, throttle, PAS/torque sensor, brake cut-offs, and lights.
Compliance in plain words (EU EPAC, UK EAPC & UKCA)
EU (EPAC): For public-road use in the EU, the relevant product standard for electrically power-assisted cycles is EN 15194. It defines safety/performance testing and the familiar EPAC envelope (pedal-assist only; assistance progressively reduces and stops by 25 km/h; ≤250 W continuous rated power). See the standard overview via BSI or competent labs (red links in Sources).
United Kingdom (Great Britain): Road-use is defined directly by the UK’s EAPC rules (age 14+, ≤250 W continuous, pedal-assist only, assistance cuts at 15.5 mph/25 km/h; pedals required). For product compliance, the UK uses UKCA with “Designated Standards.” BS EN 15194 is a designated standard that can provide a presumption of conformity under the UK’s product safety regime. The UK has also announced continuing recognition of CE marking for a wide range of goods in Great Britain, giving businesses flexibility between UKCA and CE. See the official GOV.UK pages linked in red below.
Practical setup: Create a controller “legal profile” for public roads (EU EPAC or UK EAPC limits). If you keep a “private mode,” use it only off-road or on private property.
Power & Range Mini-Calculator (on this page)
Use this to estimate mechanical/electrical power, Wh/km, trip energy, and range for your route. Tune mass, grade, wind, CdA, and Crr to match your use case; then pick controller limits and battery size accordingly.
⚙️ Lynxcle Power & Range Mini-Calculator
Assumptions: steady speed; no stop-and-go; constant speed on segments; human power not subtracted. Use as a quick sizing guide for electric bicycle conversion kits and battery planning.

Choosing electric bicycle conversion kits (hub vs mid-drive)
Rear-hub kits are the get-it-done option: fast install, low drivetrain stress, and very predictable behavior in flat or rolling terrain. Use a proper torque arm; steel dropouts/forks are strongly preferred at higher torque. Front-hub kits install even faster but load the fork; again, steel and torque arms matter. Mid-drive kits exploit your gears for hills and efficiency; torque-sensing options feel “bionic” but demand clean chainline and thoughtful mounting. The honest way to choose is to simulate power/grade/heat before you spend.
Simple decision fork: Mostly flat commuting → quality rear-hub kit. Regular hills or you want a natural “legs-plus” feel → torque-sensing mid-drive. Either way, size the controller limits and wire it cleanly.
Battery & charger discipline (standards, connectors)
Think in systems, not parts. Where possible, buy e-bike systems certified to UL 2849 (electrical system safety) with packs to UL 2271. UL 2849 evaluates the drive train, battery, and charger combination for electrical/fire safety—use that mindset even when you DIY: a matched battery+charger, documented BMS, correct charge parameters, and connectors that handle inrush and vibration.
Real-world safety signals: The U.S. CPSC explicitly warns against “universal” micromobility chargers due to fire hazards—use the correct, matched charger. FDNY materials provide no-nonsense storage/charging guidance that’s useful anywhere: charge under supervision, away from exits and flammables; avoid charging below freezing; store cool and partially charged when idle.
Connectors & inrush: Use anti-spark or pre-charge connectors (e.g., XT90-S class) on higher-voltage/current systems to reduce inrush and protect controller MOSFETs and contacts. Keep high-current runs short, protected from abrasion, and out of spray paths.
City reality: Municipalities are tightening rules around uncertified devices and unsafe charging. Don’t cheap out on packs or chargers; the regulatory wind is only blowing one way.
Braking & mechanics: keep control
Even though we start design at the controller, we ride at the mercy of traction and heat. Treat hydraulic disc brakes as your practical baseline for conversions. E-bikes carry more mass and cruise faster; larger rotors (180–203 mm) and quality pads give you torque and thermal headroom that rim (V) brakes rarely sustain in wet traffic or on long descents. Industry guidance and OEM practice converge here for a reason: margin matters in the real world.
Bottom line: We do not recommend V-brakes for modern, daily e-bike duty. They can be tuned to pass a lab metric, but heat fade and wet performance leave too little margin for error.

A 10-step conversion plan
- Define your route and constraints: rider+bike+cargo mass, target cruise speed, worst-case grade, climate (rain? long descents?).
- Controller first: pick voltage/current limits, thermal cutbacks, speed caps, PAS/torque input type, brake cut-offs, and light control. Use these to narrow your electric bicycle conversion kits.
- Draft the harness: mirror the simple wiring diagram; plan short high-current runs, drip loops, abrasion sleeves, and proper strain relief.
- Simulate before you buy: Use the on-page calculator to compare hub vs. mid-drive at your worst grade, mass, and wind; choose the setup that stays cooler at cruise.
- Battery + charger as a pair: prefer systems documented to recognized standards or from builders who publish cells/BMS and supply the matched charger. Avoid “universal” chargers.
- Legal profile: program a public-road profile (EU EPAC or UK EAPC) and keep any off-road/private mode separate.
- Brakes and wheels: hydraulic discs with 180–203 mm rotors if you’re heavy, carry cargo, ride hills, or cruise faster; re-true wheels after the first 100–200 km.
- Torque arms & mounts: mandatory for hub motors (especially front, especially alloy forks). For mid-drives, prioritize chainline, guide, and narrow-wide rings.
- First power-up: wheel off ground; verify rotation; test brake cut-offs; check controller temperatures on a quiet shakedown loop; re-torque fasteners.
- Charging discipline: supervised charging, away from combustibles; never charge below freezing; store cool and partially charged when idle.
Where to next: Jump to our A2 case studies for real kits, budgets, and upgrade order, then dive into A3 Battery & BMS 101 for cells, pack layouts, and charging strategy.
FAQ (click to expand)
Is EN 15194 “the law” in the UK?
No. UK road-use is defined by the UK’s EAPC rules. For product compliance, the UK uses UKCA with Designated Standards—BS EN 15194 is designated and can provide a presumption of conformity, but it’s within the UK’s own regime. The government also continues recognition of CE marking for a wide range of goods in GB, which gives flexibility to businesses.
What are the UK basics for riding legal?
Age 14+, pedal-assist only, ≤250 W continuous rated power, assistance cuts at 15.5 mph (25 km/h), and the cycle must have pedals. See the GOV.UK EAPC rules (red link in Sources).
Which should I choose: hub or mid-drive?
Flat/rolling routes and low maintenance → quality rear-hub kit with a proper torque arm. Regular hills or you want “natural legs” feel → torque-sensing mid-drive. Simulate power vs grade vs temperature first, then buy.
Why insist on hydraulic discs?
E-bikes add mass and speed; heat is the silent failure mode. Larger rotors and hydraulic systems give you consistent braking and thermal headroom in rain and on long descents. That’s why we treat them as a baseline.
How do I avoid charging fires?
Use the matched charger (no “universal” devices); supervise charging; keep away from exits and flammables; avoid charging below freezing; store cool/partially charged when idle. Buy from vendors who document cells/BMS and safety testing.
Sources (short, high-quality list — all red-linked)
- UK road-use rules (EAPC) — GOV.UK: Riding an electric bike
- UKCA guidance & CE recognition — Using the UKCA marking · Government explainer
- Designated standard for EAPCs — Business Companion: e-bikes
- EU EPAC product standard — EN 15194 (BSI overview)
- System-level safety — UL 2849 overview
- U.S. safety signals — CPSC: universal chargers warning · FDNY micromobility guidance
- Planning tool — Lynxcle Power & Range Mini-Calculator (on this page)
- Brake heat & consistency — Shimano: Guide to Brakes